The Ubuntu desktop has changed a lot over time. If you’re a new user, you may only know the Unity desktop environment. However, if you’re a long-time user, you may prefer the original Gnome desktop environment that was previously part of Ubuntu.
We previously showed you how to switch to the Gnome desktop environment completely. However, if all you want is the classic Gnome menu, you can easily add this to the Unity desktop environment using ClassicMenu Indicator. This tool includes all the applications and the structure of the classic menu.
NOTE: When we say to type something in this article and there are quotes around the text, DO NOT type the quotes, unless we specify otherwise.
Before installing ClassicMenu Indicator, you need to add the repository containing the PPA archive for ClassicMenu Indicator tool. To do this, type the following line at the prompt and press Enter.
sudo apt-add-repository ppa:diesch/testing
Type your password when prompted and press Enter.

The releases in the PPA are listed and you are given a chance to cancel the action. Press Enter to continue to add the repository.

Once the PPA has been added, type the following line at the prompt and press Enter. This line contains two commands separated by two ampersands (&&). The first command updates Ubuntu and the second command installs ClassicMenu Indicator.
sudo apt-get update && sudo apt-get install classicmenu-indicator
NOTE: If you run another command using sudo within five minutes of running the first one, you will not be asked for your password again.

The progress of the installation displays and then a message displays saying how much disk space will be used. When asked if you want to continue, type a “y” and press Enter.

When the installation is finished, close the Terminal window by typing “exit” at the prompt and pressing Enter.

Click the Search button at the top of the Unity bar. Start typing “classic menu indicator” in the Search box. Items that match what you type start displaying below the Search box. When the ClassicMenu Indicator tool displays, click the icon to launch it.

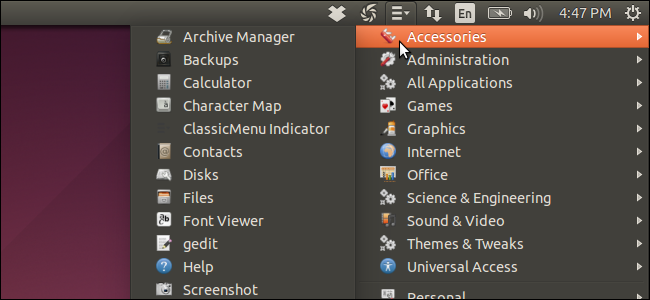
An icon is added to the top panel on the right side. Click it to access the menu and submenus. The ClassicMenu Indicator submenu provides options to customize the menu and entries. You can also change the icon that displays on the top panel to the old Ubuntu icon by selecting the Use old icon option on the ClassicMenu Indicator submenu. If you decide not to have the menu available on the panel, select Quit from the ClassicMenu Indicator submenu.
The Use alternate menu option removes the Ubuntu Software Center option from the menu. To add the Ubuntu Software Center option back to the menu, select Use alternate menu option so there is no check mark next to the option.

If you select Use old icon, the Ubuntu icon displays on the panel for the classic menu.
ClassicMenu Indicator is automatically added to the Startup Applications so it starts every time you log in to Ubuntu. If you don’t want it to start automatically, you can change this setting.
To do so, click the Search button at the top of the Unity bar again.
Start typing “startup applications” in the Search box. Items that match what you type start displaying below the Search box. When the Startup Applications tool displays, click the icon to open it.

Notice that ClassicMenu Indicator is listed in the Additional startup programs list. You do not need to delete it to prevent it from automatically starting when you log in. Simply click the check box next to it so there is no check mark in the box. Click Close to close the Startup Applications Preferences dialog box.

Now, you can access your programs using either the Unity bar or the classic Gnome menu.