If you talk to five PC users you’ll probably find six different ways to use the Windows desktop. On the one end are people like me, who prefer to have nothing cluttering up their primary workspace. On the other are people who turn their desktop into a dumping ground for webpage links, files in progress, to-do lists, and program shortcuts.
Today’s tip is for the dumpers.
The biggest downside of relying on the desktop to store files is everything you need is locked down to one PC. So why not send your desktop to the cloud, where you can access all your important data from other PCs and mobile devices via SkyDrive (soon to be OneDrive)?
For this tip you’ll need a Windows 8.1 PC or a Windows 7, XP, or Vista PC with the SkyDrive desktop program installed, though the same basic procedure sure also work with Dropbox, Google Drive, or any other cloud-syncing service that integrates with Windows’ File Explorer.
Clearing for launch
Navigate to your SkyDrive folder and at the top of the File Explorer window tap Home>New Folder. Then name the new folder Desktop, SkyTop, OneDesk…whatever you’d like.
Next, fire up File Explorer. In Windows 8.1, open This PC and look for the desktop folder. If you use another version of Windows, head to Computer > Users > [your username] > Desktop to find your desktop folder.
Important Tip: Do not right-click on the Desktop icon under “Favorites” at the top of the File Explorer window as this will not get you the behavior you want.

Right-click the desktop icon and select Properties, but you make sure you click the right desktop icon. (Click to enlarge. shown in Windows 8.1.)
Once you’ve found your Desktop folder, right-click on it and select Properties. In the new window that opens, click on the Location tab.
At the bottom, tap on the Move… button, which will open another window. Navigate to the Desktop folder you just created within your SkyDrive folder and click the Select Folder button. Once you return to the properties window, the text entry field should look something like “C:Users[your username]SkyDriveDesktop”.
Now click Apply then OK. Windows will ask you if you want to move everything. Say yes and you’re done!
If you look on SkyDrive in File Explorer, the icon for the new Desktop folder should mirror the special Desktop folder icon found under This PC when you have File Explorer open.
Now open up SkyDrive on the Web, Android, iOS, or Windows Phone and you should see your desktop files begin to populate into your cloud storage account. Depending on the number and size of files you have this could take a few minutes.
Syncing your desktop across PCs
If you’d like to sync desktops across PCs, just repeat this same process on each PC, as Microsoft hasn’t built desktop syncing into Windows as a default feature (as it has with the Modern UI Start screen in Windows 8.1). Make sure to point to the same desktop folder in SkyDrive each time.
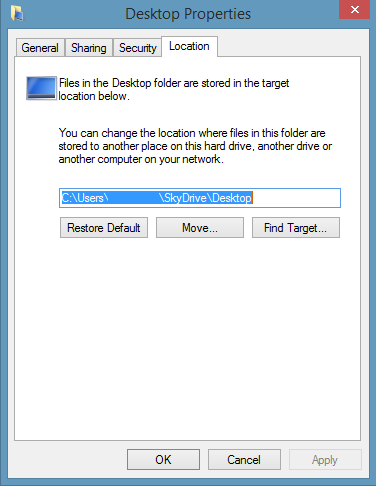
Moving your Desktop to SkyDrive takes just a few clicks and when you’re done, the file path in its Properties menu should point to a location in your SkyDrive folder. (Click to enlarge.)
Once you do this, most of your program shortcuts and web shortcuts should work just as well on different PCs, assuming you have the target programs and folders installed on both PCs in the same location. For example, I had no problem launching Skype, Chrome, or the local C: folder on multiple PCs synced this way, as they were all located at the same file location on the respective local hard drives. (You may find that some icons for programs won’t transfer, but the shortcuts will still work.)
Any files and folders saved directly to the desktop will also sync across PCs without issue.
Windows will get confused if you try to launch a shortcut to a specific file or folder that isn’t saved directly on the desktop and isn’t available in the same location on both PCs, however. For example, trying to open a desktop-based shortcut to a specific file that’s actually located in your Documents folder wouldn’t work on a PC other than the computer that particular file is actually stored on. (You could move your entire Documents folder to the desktop to alleviate that issue, however.)
Syncing your Desktop to SkyDrive can also cause a little… weirdness from time to time. In my tests, my desktop icons would appear in the middle of my secondary monitor after rebooting. But that’s a pretty specific problem and nothing you can’t fix with a quick right-click on the desktop and selecting Sort by>Name/Size/Item type/Date Modified.
Enjoy taking your desktop anywhere and everywhere!